Arduino UNO
The Arduino project was started at the Interaction Design Institute Ivrea (IDII) in Ivrea, Italy. At that time, the students used a BASIC Stamp microcontroller at a cost of $50. Massimo Banzi, with David Mellis, another IDII student, and David Cuartielles, extended Wiring by adding support for the cheaper ATmega8 microcontroller. The new project, forked from Wiring, was called Arduino.
The Arduino UNO is a standard board of Arduino. Here UNO means ‘one’ in Italian. It was named as UNO to label the first release of Arduino Software. It was also the first USB board released by Arduino. It is considered as the powerful board used in various projects. Arduino.cc developed the Arduino UNO board.
Arduino UNO is based on an ATmega328P microcontroller. It is easy to use compared to other boards, such as the Arduino Mega board, etc. The board consists of digital and analog Input/Output pins (I/O), shields, and other circuits.
The Arduino UNO includes 6 analog pin inputs, 14 digital pins, a USB connector, a power jack, and an ICSP (In-Circuit Serial Programming) header. It is programmed based on IDE, which stands for Integrated Development Environment. It can run on both online and offline platforms.
The IDE is common to all available boards of Arduino.
The Arduino board

The components of Arduino UNO board

- ATmega328 Microcontroller– It is a single chip Microcontroller of the ATmel family. The processor code inside it is of 8-bit. It combines Memory (SRAM, EEPROM, and Flash), Analog to Digital Converter, SPI serial ports, I/O lines, registers, timer, external and internal interrupts, and oscillator.
- ICSP pin – The In-Circuit Serial Programming pin allows the user to program using the firmware of the Arduino board.
- Power LED Indicator– The ON status of LED shows the power is activated. When the power is OFF, the LED will not light up.
- Digital I/O pins– The digital pins have the value HIGH or LOW. The pins numbered from D0 to D13 are digital pins.
- TX and RX LED’s– The successful flow of data is represented by the lighting of these LED’s.
- AREF- The Analog Reference (AREF) pin is used to feed a reference voltage to the Arduino UNO board from the external power supply.
- Reset button– It is used to add a Reset button to the connection.
- USB– It allows the board to connect to the computer. It is essential for the programming of the Arduino UNO board.
- Crystal Oscillator– The Crystal oscillator has a frequency of 16MHz, which makes the Arduino UNO a powerful board.
- Voltage Regulator– The voltage regulator converts the input voltage to 5V.
- GND– Ground pins. The ground pin acts as a pin with zero voltage.
- Vin– It is the input voltage.
- Analog Pins– The pins numbered from A0 to A5 are analog pins. The function of Analog pins is to read the analog sensor used in the connection. It can also act as GPIO (General Purpose Input Output) pins.
Arduino is recommended over other boards for beginners, the USB port in the Arduino board is used to connect the board to the computer using the USB cable. The cable acts as a serial port and as the power supply to interface the board. Such dual functioning makes it unique to recommend and easy to use for beginners.
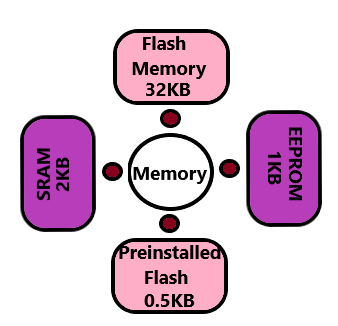
Memory
The preinstalled flash has a bootloader, which takes the memory of 0.5 Kb.
Here, SRAM stands for Static Random Access Memory, and EEPROM stands for Electrically Erasable Programmable Read-Only Memory.
Arduino UNO Pinout

How to get started with Arduino UNO?
We can program the Arduino UNO using the Arduino IDE. The Arduino IDE is the Integral Development program, which is common to all the boards.
We can also use Arduino Web Editor, which allows us to upload sketches and write the code from our web browser (Google Chrome recommended) to any Arduino Board. It is an online platform.
The USB connection is essential to connect the computer with the board. After the connection, the PWR pins will light in green. It is a green power LED.
Install the drivers of the board, connect the board to the computer, Windows from XP to 11 will automatically install the board drivers.
Select the port. Click on the Tools -> Port (select the port), upload and run the written code or sketch. Within the few seconds after the compile and run of code or sketch, the RX and TX light present on the Arduino board will flash.
ATmega328 Microcontroller– It is a single chip Microcontroller of the ATmel family. The processor core inside it is of 8-bit. It is a low-cost, low powered, and a simple microcontroller. The Arduino UNO and Nano models are based on the ATmega328 Microcontroller.
Arduino Coding Basics
We have already discussed the popular Arduino Boards, Arduino IDEs, and Installation process of the Arduino software. We learned that Arduino IDE (Integrated Development Environment) allows us to draw the sketch and upload it to the various Arduino boards using code. The code is written in a simple programming language similar to C and C++. The initial step to start with Arduino is the IDE download and installation.
Coding Screen
The coding screen is divided into two blocks. The setup is considered as the preparation block, while the loop is considered as the execution block.
The set of statements in the setup and loop blocks are enclosed with the curly brackets. We can write multiple statements depending on the coding requirements for a particular project.
The program flow in Arduino is similar to the flowcharts. It represents the execution of a program in order.
We recommend to draw the flowchart before writing the code. It helps us to understand the concept of code, which makes it the coding simpler and easier.
Example:
Let’s consider a simple LED blink example.
The steps to open such example are:
- Click on the File button, which is present on the menu bar.
- Click on the Examples.
- Click on the Basics option and click on the Blink
The example will reopen in a new window.

Arduino Serial.print ( )
The serial.print ( ) in Arduino prints the data to the serial port. The printed data is stored in the ASCII (American Standard Code for Information Interchange) format, which is a human-readable text.
Each digit of a number is printed using the ASCII characters.
The printed data will be visible in the serial monitor, which is present on the right corner on the toolbar.
The Internet is rich with projects for Arduino Uno for beginners and advanced, this makes Arduino Uno quite popular and we encourage you to look carefully at these projects and apply yourself. Here are some projects that you can find on offical website https://projecthub.arduino.cc
